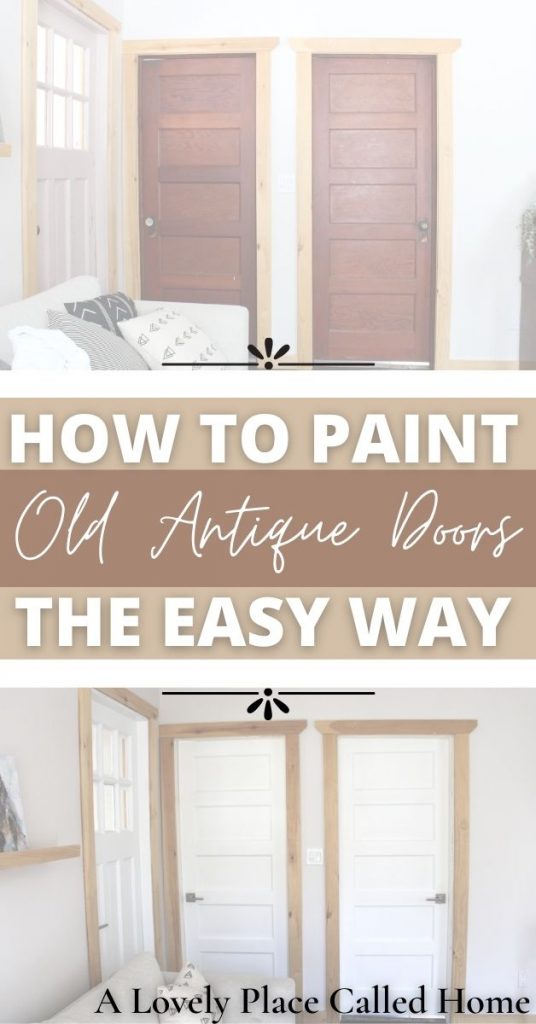
Let me walk you through how to paint old antique doors the easy way!
I’ll start by saying I am not a professional restorer, painter or carptener. But I do like to consider myself a professional DIY’er/figure-it-out’er! So in this post I will walk you through how to paint old antique doors the easy way. No paint stripping, no electric sanders, no paint guns. A true DIY that anyone can do! I did this project by myself in one weekend.
Things You Will Need:
- Primer paint
- Trim and Door paint
- DAP
- Paint brushes
- mini paint roller and tray
- Sandpaper. Get a few different grit sizes. Id recommend 150, 180 and 400)
- Scraper for applying the DAP
- Razor blade (If you have glass on your doors like I do)
- Basic tool kit
- A fan

I use Beauty Tone paint for all of my projects, I seem to have good luck with it and its available locally. But you can use whichever brand you want. I would strongly suggest buying the High Hide versions of both paints to ensure you get great coverage. Since we aren’t stripping the doors or thoroughly sanding them we want to make sure that whatever is on them doesn’t seep through.
As for the DAP, if your doors have no holes, cracks or other imperfections than you wont need it. But if they do, then buy yourself some DAP! I love this stuff, and it comes in many different applications. The one I used for this project goes on kind of like drywall mud. And you sand it off when its dry. My doors had a TON of old holes. It also had some cracking where the pieces of wood had separated over the years, and one door had scratches down it from what I’m guessing was a dog. So I needed to do a lot of patching.
Lastly, make sure you get enough supplies. Always buy a few more rollers, a few more tray inserts, and a few more of anything else. Just incase you need it! It’s the worst when your half way through a project and you realize you need more of something. ALWAYS GET EXTRA. You can save whatever you don’t end up using for your next DIY.

Let’s Get Started!
Always make sure to paint in a well ventilated room and wear a mask when sanding.
Step One:
Remove all hardware

Remove the door handles and hinges. If you are going to restore them and put them back on your doors then keep them somewhere safe until you can reinstall! I didn’t use the same handles but I did reuse the original hinges. If you’d like to learn how to make antique hinges look like new I have a tutorial here.
Step Two:
Sanding
Don’t forget your mask! Since the doors are old the paint is most likely lead based. And I don’t know much about old stain but I’m going to assume it’s not safe to breath in its particles.
Use the coarser sandpaper first (I used 150) and go over the doors entirely. The goal for this is to scuff up the old finish so that the primer sticks well. You want the shine to disappear. Don’t sand it down too much or else you’ll risk exposing yourself to more air borne particles. A light sanding is all you need.
Get every square inch.
Step Three:
DAP Until Your Heart Is content

I love DAP. Have I mentioned that? Its magical.
Apply the DAP using your scraper (It’s similar to mudding drywall) in any area that you want to disappear. Don’t spread it too thick or else it will take forever to dry. There is a learning curve and I’m still learning how to master the application process. Look it up on Youtube if you want a more in depth tutorial.
Point a fan at the doors so that they dry faster. The DAP should dry pretty quickly, around one hour.
Sand off all excess DAP until there’s almost nothing left except what is filling the holes or cracks. You might need to do another coat if the area still isn’t fully smooth. If so then reapply and repeat the process.
Make sure you sand off all extra DAP. You might think it will blend in once the paint is on but it actually sticks out pretty bad, just like a bad drywall job would.
Step Four:
Final Sanding
Take your finer grit of sandpaper and go over everything again. This is the last sanding so make sure you go over every part of the door.
After your done sanding take a rag and wipe down the door. You can make it damp but I didn’t because that wouldve taken longer for the drying process. As long as you’re thorough the dry rag should be enough.
Step Five:
Prime and paint!
I will tell you my mistake now so that hopefully you can avoid it:
I didn’t let my primer cure long enough. This caused the old stain to show through when I was painting. Which meant I had to apply WAY MORE coats of paint to my stained doors.
Don’t be like me. Let your primer cure.
Anyways…
Prime your doors. Two coats and then let them cure.
Paint as you normally would, using the brush first and then the roller. Point your fan on the doors you aren’t working on so they dry faster. I did several coats of paint and I could probably do one more for an even whiter finish since I had the old stain leak through so bad. But they look great so I’ll probably just leave them as is.
Check out how great the bottom of this door looks now!

Step Six:
Install the hardware!
Now that the doors are painted and cured you can install your new hardware (Or use the original). I chose to go with a more modern look and I’m using brushed nickel door knobs. They match our front door and I think they will appeal to potential buyers when we list our house! But I did keep and restore the antique hinges, they were custom fitted to each door so it’s easier to use them again. And they are so adorable! After I cleaned them they showed rust marks once they dried so I wiped them down rubbed coconut oil on them. They haven’t shown rust since.

The old door knobs left some pretty large gaps and holes in the doors that the new modern door knobs weren’t going to cover, and I wasn’t sure how to easily fix it.
Then my husband suggested installing the new hardware and foaming and applying DAP over it to smooth it all out (DAP to the rescue again). It worked so great I kind of thought maybe we did something wrong! It’s a very easy process, all we did was;
- drill the hole for the new door handle
- tape off all holes and openings
- spray foam until the gaps are filled and wait until its dry
- take tape off and cut out any foam that will block the new hardware
- install hardware
- dap over any extra space remaining
- sand and paint

Such a simple way to transform old antique doors without any special tools or materials! And it really does transform the space. It makes our small home feel a little bit bigger and brighter.

Thank you for reading How To Paint Old Antique Doors The Easy Way. Want to see more from me? Follow me on social media and join my newsletter! I don’t email often, so you will never feel spammed by me. Thanks for stopping by!
Follow me on instagram! @alovelyplacecalledhome
View another popular post: How To Build The Interior Of A Tiny House On Wheels


Thank you for the great information. I have antique doors in my house and have often thought that it would be very difficult to paint them, but this really helps!
its so worth it! for us it really transformed the space and brought in so much light
Wow! Those look so great! I haven’t used DAP before so I’m anxious to try it now!
its awesome to use!
I am painting an old hotel fir door that has two holes to fill. I liked your idea of spray foam and Dap, but will the spray foam shrink over time? Have your holes been visible at all after filling them that way?
hey! the spray foam won’t shrink if you good quality foam. the holes arent visible because the dap, sanding, and painting process sealed it completely! it is a really easy hack!